If you’re just getting started in woodworking or have been at it a while but haven’t built anything other than small projects, learning how to build a table can take your craft to the next level.
Tables are relatively easy to design and build, and they usually don’t require a lot of expensive tools that the average do-it-yourselfer doesn’t already have. In this article, you’ll learn about the tools and techniques you need to build any kind of wooden table.
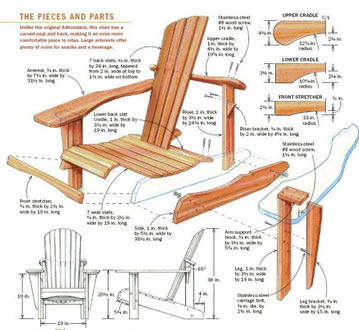
Table Anatomy
A table is one of the easiest woodworking projects to build, and is essentially just nine pieces of wood: a top, four legs and four apron pieces. The apron, also known as the skirt to some woodworkers, joins the legs together to form the base.
Table Joinery
Joinery is an important consideration when building a table, and you have several good options that will allow you to build a strong piece of furniture. To join the legs of your project to the apron, you can use pocket screws, dowels, biscuits, metal brackets or mortise-and-tenon joints.
You can get metal brackets for $5 or $6 online, which are easy to install. Choose dowels, biscuits or mortise-and-tenon if you have the appropriate tools (dowel jig, biscuit joiner, small router) and the patience for more difficult joinery. Once you’ve decided on one of these options, you’ll need to figure out how to attach the tabletop to the base.
You can use metal “z”-shaped fasteners, pocket screws, or make your own hardware. The metal “z” hardware is an inexpensive and easy choice that allows for the natural expansion and contraction of solid wood. Don’t use pocket screws with a solid wood top; they don’t let the wood move and might cause your top to crack.
Tabletop
MDF, plywood and solid wood are all viable choices for a tabletop. If you use MDF, plan on covering the edges with some kind of veneer tape. You can then veneer the top or paint it.
Plywood will also need to be edge-banded, but it can pass for real wood if you do a good job staining and finishing it. Solid wood is probably the most attractive and durable material for a tabletop, but it’s more expensive and requires more skill.
To make a solid wood top, you’ll have to glue several small boards into one big one, and then plane/sand that big board to a flat, uniform thickness. A belt-sander is a must-have for this kind of top. If you make your tabletop out of solid wood, you’ll be able to route a decorative profile into the edge, which is a nice way to add some special details to your work.
Tools for Building a Table
You don’t need many tools to make a sturdy table: a circular saw, miter saw, small router, dowel jig, drill/driver are about it. A jigsaw will come in handy for circular tables.
Table Plans
To get you off to the right start, here’s a set of table plans you can adapt to your needs. If you build the project according to the dimensions provided, you’ll end up with the perfect end table. But don’t feel confined to the plans. Use them as guides for your own ideas.
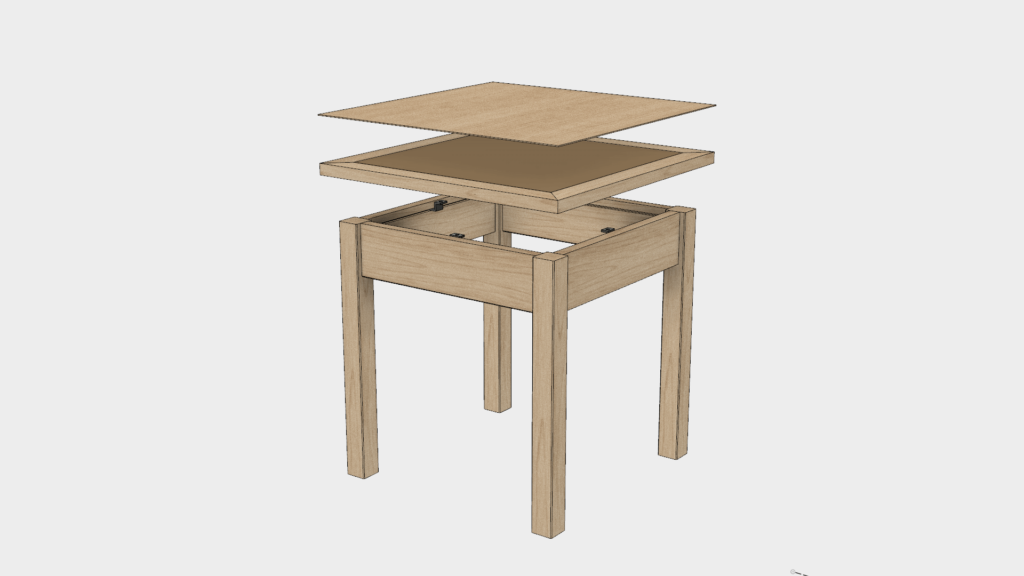
Parts List
- (1) Tabletop @ ¾” x 18” x 18”
- (4) Legs @ 1-½” x 1-½” x 17-¼”
- (4) Aprons @ ¾” x 3-1/2 x 13-½”
- (4) Tabletop fasteners
If you own a jointer and planer, you can buy rough-sawn lumber and prepare it to the dimensions above. But we’ll assume you don’t own one for the purposes of this article. If that’s true, just pick up S4S lumber at your hardware store or home center. You should be able to find sizes for the parts list with no problems.
How to build a wooden table
Step 1: Make the Legs
If you buy 2×2 lumber, making the legs is as simple as cutting them to length on your miter saw. You can add a taper to the bottom of the legs to make the project a bit more elegant. That’s easy to do with a jigsaw. Just measure up from the bottom of the leg about 4” and make a mark. Then make another mark about ¼” – ½” from one of the faces. Connect the marks with a pencil line and cut along the outside of the line with your jigsaw.
Step 2: Make the Apron
Get 1×4 lumber from the home center for these parts and you won’t have to do any ripping or planing/jointing. Unless you want to cut an arc into the apron, just cut the pieces to size on the miter saw and you’re done.
Step 3: Cut the Joinery
Now’s the time to mark your table parts for the joinery. It’s a good idea to hold mating parts up to each other so that you can mark them at the same time. For example, hold an end of one apron up to the leg it will be connected to and draw a short line on both parts where you’ll cut a biscuit slot or drill a dowel hole.
Cut a groove along the top edge of the aprons for the table hardware. Consult your hardware instructions for the exact location.
Step 4: Add Chamfers
Nothing makes a simple table like this stand out like a nice chamfer on all of the exposed edges. Install a chamfer bit in a palm router and route all four long edges of the legs and the bottom edge of each apron.
Step 5: Sand and Finish the Base Parts
It may seem odd to do any finishing before assembly, but it’s much easier to do it now than after the project is assembled. Sand your parts to whatever grit you prefer. #180-grit is good for most finishes. Cover the joinery with masking tape to protect it from the finish. Then apply paint or stain and oil/varnish. Once it’s dry you can move on to the next step.
Step 6: Assemble the Base
After you’ve finished the base parts, apply glue to the joints. Clamp the base together and allow the glue to dry.
Step 7: Make the top
To make a solid wood top, glue several narrow boards into a wide panel. Apply an even bead of glue to the edges of each board. Place the boards in the clamps and align their faces so that they’re as even as possible. You’ll have to plane or sand everything flush when the glue is dry, so avoiding any large discrepancies will save you a lot of work. Remove the panel from the clamps when ready, sand it and cut it to size with your circular saw or table saw.
You can cut a piece of plywood to size and apply veneer tape or solid wood edging for a simpler top. Once the tabletop is done, sand and finishes it before attaching it to the base. Make sure to chamfer all of the edges if you make a solid wood top.
Follow the tabletop fastener instructions to connect your top to the base. That’s all there is to it. Use these plans as a basis for all sorts of tables, including desks and dining tables.